Axiom III Safesuite - User Manual
INTRODUCTION
AXIOMIII SAFESUITE system has been specifically designed for Condominium living to allow for more flexibility on off-site notification and onsite interaction with the buildings common area, while maintaining individual suite control.
- The Axiom III Safesuite is an 8-zone, fully supervised alarm control panel. Specific areas of detection are called zones. Zones can be programmed to have different characteristics. Some zones may be 24-hour zones, that is, they remain armed even when the alarm system is off. Zones used for fire detection, for example, are always 24-hour zones In addition, some zones can be programmed to allow bypassing. When you bypass a zone, you temporarily remove it from the alarm system. Bypassed zones, however, are not protected.
- The panel can be programmed with eight (8) different user codes.
- The panel also has DURESS CODE functionality.
- User codes are normally used for arming and disarming the panel. Duress code is used for disarming / arming while sending a silent panic code to security.
- The panel has a PRIMARY CODE (code #1) which is used for programming the keypad as well as arming and disarming. This code has a default value of 1234 and should be changed after installation since all of the units come with the same default code. The Primary code (code #1) though can be changed, cannot be deleted (see programming section).
- The rest of the user codes (#2 to #8) can be changed or deleted any time.
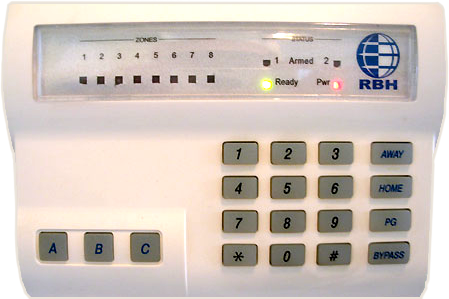
AxiomIII Safesuite Display
Keypad display consists of eight Zone lights and four Status lights.

Keypad Operation
Status - Light (Led) Indications
| POWER LED | ON: | Unit Powered up. |
| OFF: | No Power. | |
| FLASHING: | No Communication. | |
| READY LED | ON: | All zones are Normal (closed) and ready to arm. |
| FLASHING: | Alarm in Memory (when system is disarmed) or for the duration of the Exit delay (when system is armed). |
|
| ONLY ARMED 1 LED |
ON: | System in HOME ARM mode. |
| ONLY ARMED 2 LED |
ON: | System in INSTANT mode (night time arming). |
| BOTH ARMED 1 & ARMED 2 LED |
ON: | System is Armed (AWAY mode or Forced Arm mode). |
| FLASHING: | System in Alarm. |
Zone-Light (Led) Indications
8 zone lights represent 8 different zones, for example, zone LED 1 represent area programmed as ZONE 1.
| ZONE LED 1-8 | ON: | Corresponding zone open. |
| FLASHING: | Bypassed zone, for the duration of the Exit Delay (when system is armed). |
To understand the status of these lights (LED's) event-wise, see the following functions of the keypad.
Lights(LEDs) functionality event-wise
| POWER LIGHT | READY LIGHT | ARMED 1 LIGHT | ARMED 2 LIGHT | ZONE LIGHT |
REMARKS | |
|---|---|---|---|---|---|---|
| Unit Powered | ON | - | - | - | - | Keypad is powered up |
| Power Failure | OFF | OFF | OFF | OFF | OFF | Power failure. |
| No Communication | Flash | - | - | - | - | Unit lost communication. |
| System Ready All Zones Normal |
ON | ON | OFF | OFF | OFF (All) | Ready to Arm. |
| System Armed Away Mode |
ON | OFF | ON | ON | - | Ready light will flash for Exit time. |
| System Disarmed | ON | ON | OFF | OFF | - | Ready light on if system is disarmed. |
| Exterior zones Armed (Home Arm) |
ON | OFF | ON | OFF | - | Interior zones are disarmed, and exterior zones are armed. |
| Arming at Night (Instant Arm Mode) |
ON | OFF | OFF | ON | - | Interior zones are disarmed. No entry/exit delay. |
| Armed with zone open (Forced Arm Mode) |
ON | OFF | ON | ON | - | Arming while a zone is open. |
| System in Alarm | ON | OFF | Flash | Flash | - | Armed 1 & 2 lights flash in Alarm. |
| Zone Open | ON | - | - | - | ON zone 1-8 |
Numerically represented zone light ON when zone opens. |
| Memory | ON | Flash | - | - | Flash | Last alarm in Memory. |
| Zone Bypass | ON | OFF | ON | ON | Flash (exit time) | Zones are not shown when system is armed in HOME or INSTANT mode. |
| Zone Trouble | ON | ON | OFF | OFF | Flash | Corresponding zone light flashes(system disarmed). |
Axiom III Safesuite Security Functions
ARMING (AWAY MODE)
- Before arming the panel ensure READY LIGHT is ON steady.
Panel will not arm if READY LIGHT is flashing (see MEMORY function). - Enter your four-digit user code followed by # or enter your user code, and press AWAY key.
- ARMED 1 & ARMED 2 lights will turn on, the READY light will flash, and the EXIT TONE will sound for the duration of EXIT delay (45 seconds by default).
- Within this time you may exit the premises without causing an alarm. At the end of exit delay, the exit tone will stop; the READY LIGHT will turn OFF.
The Panel is now ARMED.
HOME ARM MODE
Home Arming arms perimeter zones: while bypassing interior zones (e.g. motion detector). The zone lights will indicate accordingly when any of the zones open.
- Make sure the green READY light is ON
- Enter your four digit user code, press "11 and #"
OR Enter your user code, press "HOME" key.
_ _ _ _ 1 1 # or _ _ _ _ HOME - Only ARMED 1 light will turn ON steady.
Panel is in HOME mode.
INSTANT ARM MODE (Also known as EVENING MODE.)
Instant mode is used to arm panel while still remaining in the premises, for example, arming at night time.
- Make sure the green READY light is ON
- Enter your four digit user code, press 22 followed by #
OR Enter your four-digit user code, press "PG' key.
_ _ _ _ 2 2 # or _ _ _ _ PG - Only ARMED 2 light turns ON steady.
- Arming the panel in INSTANT mode arms panel with no entry/exit delay and disables interior zones (e.g. motion detectors).
FORCED ARM MODE
Arming the panel while a zone is open. FORCED ARM automatically bypasses an open zone, but the zone becomes part of the system once closed.
- Enter your four digit user code, press 33 and #.
_ _ _ _ 3 3 # - Both ARMED 1 & ARMED 2 lights will turn on
BYPASS MODE (Also known as SHUNT MODE.)
Bypass mode is used to temporarily disable one or more zones from being armed.
- To BYPASS one or more zones, enter your four-digit user code, and press "BYPASS" key
- All zone lights turn on, indicating the panel is in BYPASS mode.
- Key-in zones to be bypassed (1-8). Corresponding ZONE LIGHT will turn off.
- Exit BYPASS MODE by pressing the # key.
The panel is now ready for arming, disabling the bypassed zones. - Now when the panel is armed, the ARMED 1 & ARMED 2 lights will turn ON Steady, the READY light & BYPASSED ZONES lights will flash, and the EXIT TONE will sound for the duration of the EXIT DELAY.
- At the end of the exit delay, the exit tone will stop; the READY LIGHT and the BYPASSED ZONES LIGHTS will turn OFF.
All bypassed zones are cleared when the panel is disarmed.
NOTE: To cancel the bypassed zones before arming the system, key-in the bypassed zones one more time. The corresponding zones lights will turn on again (keying in bypass zones will toggle them on/off, light OFF zone bypassed, light ON zone is not bypassed).
Press the # key to EXIT BYPASS MODE and now the panel is ready to arm.
DISARMING
- On entry from the main entry point, the ENTRY DELAY TONE is activated.
- Enter your four digit user code, followed by the # key: _ _ _ _ #
within the ENTRY TIME (30 seconds by default) to disarm the system. - If a valid code is not entered during the ENTRY DELAY TIME, the panel will go into ALARM.
- If an access code is entered incorrect, press the # key and re-enter the user code followed by #.
DOOR CHIME
- To enable a door-knock sound whenever a zone is open, press and hold the number key button corresponding to the desired zone on the keypad for approximately 3 seconds.
- The door chime is enabled if you hear a KNOCK sound and if you hear an ACKNOWLEDGE sound, the door chime is disabled.
CANCELING AN ALARM.
After an alarm, the panel audio sounds. ARMED 1 & ARMED 2 lights flash. The corresponding zone light, which caused the Alarm, will also flash.
- Key-in your four digit user code followed by # to disarm the system: _ _ _ _ #
- READY and the zone light will flash, indicating ALARM MEMORY.
- To clear MEMORY, enter 0 8 #
Note: Alarm/Siren time out is 5 minutes by default.
ALARM MEMORY
- Last zone in alarm can be recalled by pressing 0 9 #
- Last alarmed zone light and READY light will start flashing again until memory is cleared by pressing 0 8 #
Last zone in alarm is cleared from memory when the panel is armed
Emergency Keys
FIRE KEY
- Press and Hold the "A" or 7 & 9 keys together for over 3 seconds to activate the FIRE ALARM.
- ARMED 1, ARMED 2, & READY Fights wilt start flashing with a pulsing siren.
NOTE: This alarm will not time out and must be cleared by entering a valid password.
AUXILIARY KEY
- Press and Hold the "B" key or 4 & 6 keys together for over 3 seconds to activate EMERGENCY ALARM.
- ARMED 1, ARMED 2, & READY lights will start flashing with a buzzer pulsing.
NOTE: This alarm will not time out and must be cleared by entering a valid password.
PANIC KEY
This is an alarm to call Security silently.
- Press and Hold the "C" key C or 1 & 3 keys together for over 3 seconds to activate PANIC ALARM.
DURESS CODE
In extraordinary situations where you are forced to arm/disarm the system (for example, at gunpoint) and you want to send silent message to Security as well, the DURESS CODE feature of the panel is very useful to activate the PANIC ALARM.
- Enter your four-digit user code and Press 99 followed by #: _ _ _ _ 9 9 #
- The system will disarm/arm and will send a silent message to Security as PANIC ALARM.
ACCESS CONTROL (OPTIONAL)
By using some of the Non-Password protected command codes, following optional access control features can be activated.
ENABLE ENTRANCE TO BUILDING
Pressing keys 0 1 #
Opens lobby's door #1 momentarily. The system can be set up in such a way that the Suite owners can use it to
release an ENTRANCE DOOR to the building as & when they desire
Pressing keys 0 2 #,
Opens lobby's door #2 momentarily. This feature, if set up, can be used to release a second ENTRANCE DOOR to the
building.
ELEVATOR CALL
Pressing keys 0 3 #
calls elevator to your floor.
AUDIO/VIDEO CONTROL
Pressing keys 0 4 #
toggle audio # 1 on/off.
Pressing keys 0 5 #
toggle audio #2 on/off.
Pressing keys 0 6 #
toggle video #1 on/off.
Pressing keys 0 7 #
toggle video #2 on/off.
PROGRAMMING
ENTER PROGRAM MODE
Press the four-digit PRIMARY CODE (code #1) followed by the keys 55 and #.
_ _ _ _ 5 5 #
by default it is 1 2 3 4 5 5 #
Zone lights flashing across indicate the activation of programming mode.
Note:
- Only the PRIMARY CODE works for programming mode. The rest of the user codes (code #2 to #8) cannot be used to activate programming mode.
- If no key is pressed for programming within the TIME OUT period (45 seconds by default), the panel will exit program mode.
While in program mode the following functions are available by entering their corresponding codes. To exit from any of those functions press # and the unit will revert back to programming mode again.
CHANGE OR ADD USER CODE
- Enter Programming mode.
1 2 3 4 5 5 #
Zone lights will be flashing across. - Keys 01 to 08 represent corresponding user codes 1 to 8.
Press the desired keys to add/change the user code and #,
0 n #
(n is 1 or 2 or 3, etc)
The corresponding zone light turns on steady. - Add or change the nth user code by pressing four digits followed by #, e.g.
7 3 6 6 # - The panel will be back in programming mode, indicated by zone lights flashing across.
- Repeat the same procedure for next user code.
CLEAR (DELETE) USER CODES
- Enter Programming mode.
1 2 3 4 5 5 # - Press the corresponding keys to delete the desired user code followed by #
0 n # - Press * key four times followed by # : * *
* * #
the user code is clear. - The panel will be back in programming mode, indicated by zone lights flashing across.
- Repeat the same procedure to delete next user code.
CHANGE ALARM/SIREN DURATION TIME
- Enter Programming mode: 1 2 3 4 5 5 #
- Press keys 1 3 #
- Enter alarm/siren timeout in minutes by pressing 3 digits (001-127)
- Press # to be back in programming mode.
Note: By default alarm time out is 5 minutes.
CHANGE 24-HOUR DELAY ZONE DURATION TIME
To change 24-hour delay zone (such as smoke detector) time out duration (by default 120 seconds).
- Enter Programming mode: 1 2 3 4 5 5 #
- Press 1 4 #
- Enter 24-hour delay zone timeout in seconds by pressing 3 digits (001-127).
- Press # to be back in programming mode.
CHANGE EXIT DELAY TIME
By default exit delay time is 45 seconds. To change it:
- Enter Programming mode: 1 2 3 4 5 5 #
- Press keys 1 2 #
- Enter exit delay time in seconds by pressing 3 digits (001-127).
- Press # to get out of the function and revert back to the programming mode.
CHANGE ENTRY DELAY TIME
By default entry delay time is 30 seconds. To change this timing:
- Enter Programming mode: 1 2 3 4 5 5 #
- Press keys 1 1 #
- Enter exit delay time in seconds by pressing 3 digits (001-127).
- Press # to get out of the function and revert back to the programming mode.
EXIT PROGRAMMING MODE
- Pressing keys 5 5 # exits programming mode.
- The zone lights turn normal.
Definitions
ALARM
A condition that occurs when the detection devices in a zone are triggered after the system is armed.
ALARM MEMORY
Alarm conditions are stored in memory until cleared.
BYPASS
To take a zone out of the circuit. Bypassing malfunctioning zones allows the rest of the system to be armed.
Bypassing interior zones allow freedom of movement within the premises, while arming the outer zones. Note:
Bypassed zones are not protected.
ENTRY DELAY
The time you have to enter the premises through a designated DELAY ZONE and disarm the panel (before an alarm
occurs). The delay time is programmable (see the programming section).
EXIT DELAY
Once the system is armed, the time you have to exit the premises through a DELAY ZONE (before an alarm occurs).
The exit delay time is programmable (see the programming section).
ZONE
One of the protected areas in your premises.
24-HOUR ZONE
A zone that is always active, whether the system itself is armed or disarmed. FIRE, AUXILIARY and PANIC zones
are
examples of 24-hour zones. Entering a valid four-digit user code clears alarm conditions on these zones.
NOTE: Not all features of the following alarm system are activated in May Tower II.
_ _ _ _ stands for your user code.